

Hi,
My RV-10 is a flying bird. But I've developed a fuel leak in the inboard corner up against the spar... basically in a spot that I will need to remove the tank to repair.
I am looking for advice on removing/reinstalling the tank.
In order to get the tank off the plane, I need to get access to the 21 through-spar AN-3 bolts. I think I am going to need to remove the Aileron torque tube that runs along the aft side of the main spar to make the job easier. This, of course, means removing the wing-tip so that the torque tube can exit the wing through the lightening holes.
Has any one in this forum accomplished the removal/reassembly of a fuel tank? I plan to use teflon sockets so that I don't scratch the spar.
Background...
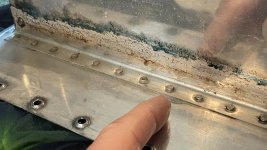
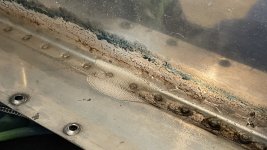
My plan is to remove the tank, repair the leak and reinstall. Best case scenario, I may discover that it's only just a rivet leaking and I'll fix just that, but I think it's going to be the seam where the rib, skin, and back of the tank come together at the back corner. Hence, I think I'll have to drill out the rivets on the entire rear T-1002 tank baffle (over 200 rivets), clean and re-proseal and re-rivet the entire thing back in place.
Another impetus for possibly removing the entire back of the tank is that I would like to add a filler neck. This (purchased) plane was built with an inboard and outboard wing tank. Only the outboard tanks have filler necks installed. The outboard tank has hose that feeds inboard tank. I'd like to consider separating the tanks so they can work independently.
My RV-10 is a flying bird. But I've developed a fuel leak in the inboard corner up against the spar... basically in a spot that I will need to remove the tank to repair.
I am looking for advice on removing/reinstalling the tank.
In order to get the tank off the plane, I need to get access to the 21 through-spar AN-3 bolts. I think I am going to need to remove the Aileron torque tube that runs along the aft side of the main spar to make the job easier. This, of course, means removing the wing-tip so that the torque tube can exit the wing through the lightening holes.
Has any one in this forum accomplished the removal/reassembly of a fuel tank? I plan to use teflon sockets so that I don't scratch the spar.
Background...
My plan is to remove the tank, repair the leak and reinstall. Best case scenario, I may discover that it's only just a rivet leaking and I'll fix just that, but I think it's going to be the seam where the rib, skin, and back of the tank come together at the back corner. Hence, I think I'll have to drill out the rivets on the entire rear T-1002 tank baffle (over 200 rivets), clean and re-proseal and re-rivet the entire thing back in place.
Another impetus for possibly removing the entire back of the tank is that I would like to add a filler neck. This (purchased) plane was built with an inboard and outboard wing tank. Only the outboard tanks have filler necks installed. The outboard tank has hose that feeds inboard tank. I'd like to consider separating the tanks so they can work independently.
Last edited:

 Don't want to damage the sealant you're not replacing. Isopropyl alcohol (hygroscopic and low surface tension) would probably work, too.
