When I chose my color scheme I was unaware you couldn't wet sand and polish metallic colors. Well I tried real hard numerous times, looked like ****. I asked Stewart what they suggested. They recommend covering with clear. He recommended the entire piece, I am only covering the blue. Also, not quite how they say to paint in the instructions. Usually they have you scuff up between coats; that would defeat the purpose. On the blue I painted normally, then let it dry about 1.5 hours; still slightly tacky but no color transfer. Then coat with clear as directed. Let it dry for a few days, wet sand and polish.

Van's Air Force
You are using an out of date browser. It may not display this or other websites correctly.
You should upgrade or use an alternative browser.
You should upgrade or use an alternative browser.
More good results with stewart, clear coat
- Thread starter andrewtac
- Start date


David Paule
Well Known Member
Mark, those look terrific.
How about a couple of tutorials? One for the joint between the tip and the surface, and one for painting color and clear with Stewart?
Thanks!
Dave
RV-3B, working on the composite canopy frame for mine
How about a couple of tutorials? One for the joint between the tip and the surface, and one for painting color and clear with Stewart?
Thanks!
Dave
RV-3B, working on the composite canopy frame for mine
Are you able to get a blend across the masking line with the clear so that there is no step?
I chose not to, this is what Stewart recommend; clearing everything. I don't mind the steps. The added weight probably wouldn't be much on the tail, but the entire plane I figured it would be significant.
Knowing now what I know not sure I would be doing what I am. I went single stage to reduce the work, reduce the weight (amount of paint), allow me to make quick easy repairs. I think a BC/CC would allow those things as well. I don't dislike the stewart or even the single stage, just kind of talked myself into it.
Mark, those look terrific.
How about a couple of tutorials? One for the joint between the tip and the surface, and one for painting color and clear with Stewart?
Thanks!
Dave
RV-3B, working on the composite canopy frame for mine
Not sure I'll get to making videos, but I'll add a bit more and I am happy to answer questions. Warning, though, I am a novice; most of this I learned from here or trial and error.
For the tips, I did as suggested here with micro/flox mix for build up, and then as I got close just micro. I did cleco the tips on, and sand to fit. Once I installed I used aeropoxy filler (from ACS) to cover the rivet holes and blend the metal side to the fiberglass. When doing this I'd tape upto the metal edge to try to keep the filler out of the gap. I would also us a credit card to try and pull out any filler in the gap. Then I'd use a razor blade when it was dry to scrape the filler edge, then fold a piece of a sand paper in half to sand the gap. I sanded the gap this way between every application (filler, primer, paint, etc.) This made for consistent gap among all the parts. I don't know if this will hold up or not. I read where some folks said not to fill the gap as it might crack, so I decided to do it this way. However, there is some filler in the gap at the base and around the edge. Hopefully if there are cracks, they won't be noticeable. I intentionally chose a dark color for all the gaps as I figured it would hide potential cracks and also if the gaps weren't quite square it won't be as noticeable.
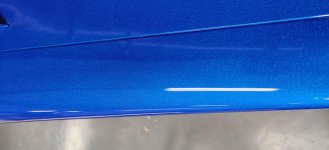
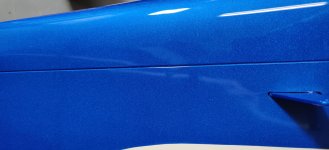
For the clear it wasn't to hard. I painted the base per the instructions. I used their primer, sanded, top coated the entire piece white, sanded it to 1000 grit, then I taped off the stripe and blue section. I started with the black stripe, painted it per their instructions. After a day I masked off the stripe and went to do the blue/clear. I painted the blue per the instructions, but I did lay it a little thinner than normal, just barely wet. I did this for a couple reasons. First, I could not afford to get a run as it wouldn't sand out well with the clear on top (without clear a little run is no problem to sand out as I am wet sanding anyways). Second, I wanted to minimize risk of solvent pop. With the Stewart paint, if you get solvent pop it is horrible (at least in my experience; tons of bubbles that go to the base of the paint and you cannot fix it, you must start over). My first attempt of clear over the blue, I had pop and had to sand it all off. Third, weight, trying to not over do the paint. I made sure I sprayed and equal amount to the masking paper as I used this as my test piece. After I got my lightly wet top coat, I let it dry about 1.5 hours. I figured I wanted it tacky, not cured, but somewhat cured (again the pop); I ensured I could press on the paint on the masking paper with a finger and get no paint transfer, then I did the same check on a piece of the painted part that was hidden. Then I sprayed the clear much like the blue, per the instructions. 3 fog/tack coats, then a final wet coat giving time in between coats to tack up, then a wet coat. Again, I cut back a little on the wet coat. It was just barely opaque, dries clear. On my first attempt with all the pop, I had sprayed it on heavy like normal and it was beyond just barely opaque. Anyways, similar reasons before for not putting on a wet final coat, just barely wet. Once it dried, wet sanded 1500/2000/3000 then 3m compound/polish/fine polish. On the wetsand with 1500, I just barley knocked down any orange peel, as I knew the clear was thin. I did bust through on the bottom of the rudder. Lucky it was the bottom. I am not going to fix it, as you can't really see it (and this isn't a show plane) and the base is a single stage. Anyways, I've rambled for a while. I'd be happy to answer questions, but not really setup to do videos.
David Paule
Well Known Member
Thanks, Mark, that's what I was hoping for, not a movie.
Question, how much air does your compressor put out?
Dave
Question, how much air does your compressor put out?
Dave
sparkcrafter
Active Member
Mark,
Can you provide additional details on your settings for spraying primer and color? Pressure at the gun, percentage of water added, gun fluid setting, etc.
I’m still trying to dial in the best settings for both primer and topcoat with the Stewart Systems.
Jerald
Can you provide additional details on your settings for spraying primer and color? Pressure at the gun, percentage of water added, gun fluid setting, etc.
I’m still trying to dial in the best settings for both primer and topcoat with the Stewart Systems.
Jerald
Pressure I use the instructions, I think it was 23psi, tips I use what is in the instructions. I use the devilbiss gun they recommend. One of my biggest learning curves was fluid amount. I thought wide open was the answer. There are several posts on here that have some recommendations buried in there. I think I found for color start with 3/4 out and adjust 1/8 out at a time, to get to 1 and 1/4 for the wet coat. Primer I do similar, probably start at one full turn for a fog coat then 1 1/2 for the wet.
Water per the instructions with a scale.
Water per the instructions with a scale.
Hi,
Seems a very nice blue color you have chosen") .
.
I am in the progress to design a paint scheme on my RV-7, the colors are pretty firm now. A blue metallic on the top and one or to gray shades below. Maybe separated with thin bands of black separating the colors.
But I have been advised not to use metallic as there might be a difference in colors depending if the material painted on is metal or fiberglass.
Have you experienced this? To me it sounds a little bit strange, I have never seen that problem on a car. But now I am a novice regarding car and aircraft paint....
/Conny
Seems a very nice blue color you have chosen
. I am in the progress to design a paint scheme on my RV-7, the colors are pretty firm now. A blue metallic on the top and one or to gray shades below. Maybe separated with thin bands of black separating the colors.
But I have been advised not to use metallic as there might be a difference in colors depending if the material painted on is metal or fiberglass.
Have you experienced this? To me it sounds a little bit strange, I have never seen that problem on a car. But now I am a novice regarding car and aircraft paint....
/Conny
Depends a lot on the type of paint and type of metallic flake in that paint. Spray technique can change the way that the flakes settle and lay/orient in the paint. If you are not very consisitent with your technique, you can get differences in the look and sometimes color shade. These is mostly for base coat. While I have never used metallic S/S paint, I would guess that S/S paints don't have this issue, as they are much thicker than base coat. Surface make up is irrelevant, as you would be spraying color on to some type of primer'ed surface, not a metal or F/G surface.
Opacity is an issue for many paints, including non-metallic. This is typically addressed by using the same color primer or adding coats.
Larry
Last edited:
Another thing that can change color is getting multiple batches of paint. I painted a car, and the doors are a different color due to this. I am painting as I build with this aircraft, so I run the same risk. I accept the risk, and if it occurs I am not to worried. I do think the risk is mitigated some by using a small manufacture that mixes their own paint. On my car I used Sherwin, I had mail ordered a bulk of my paint but when I ran out I used a local store. Well evidently their mix was different.
David Paule
Well Known Member
Just for an email from Stewart saying that we should expect significant shipping delays through the holiday period and that on January 4, there will be a price increase. It'll be non-uniform, varying by product.
Also, business is good and they are expanding.
Dave
Also, business is good and they are expanding.
Dave

