What's new
Van's Air Force

Don't miss anything! Register now for full access to the definitive RV support community.

IO 540 Sump Gasket replacement

Jesse23

Well Known Member
Anyone change one of these in place? Lycoming says it can be done, but looks tight to raise the top half or lower the bottom half at least an inch or so to get over the studs and remove, clean and slide the new gasket in.

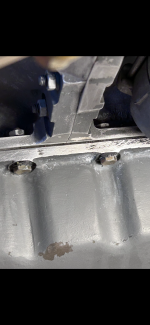
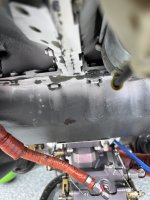
It’s weeping vs affecting the oil level between the 2 front middle bolts. Every few flights I have to wipe the oil film on top of the air box. It’s totally dry all the way around the rest of the gasket. A teaspoon of oil creates a mess in the lower cowl.
 

Attachments

  • IMG_5198.png
    IMG_5198.png
    6.3 MB · Views: 58
  • IMG_5188.jpeg
    IMG_5188.jpeg
    1.6 MB · Views: 55
Before you try gasket replacement, clean that area really well with some MEK or Acetone. Blow out the crack area really well and then I would mix up some pro-seal and use that to seal up the area. Get a small little squeegee and really work the sealant into the crack. Then I would apply a cover bead of sealant over that area, expanding beyond the leaking area by several inches. I have some luck on spots on the engines sealing up leaks with proseal. RTV is not a good sealant in this application. You may even want to get the paint off that area and really scour it to get good adhesion. Let it cure for a few days and then go flying. If it holds-great. If not, scrape it off and do the gasket change. You can hoist up your engine and pull the bottom ears off the oil sump. I wouldn't try and clean up the faces with anything in place as you can get some gasket contaminants into the sump and then you'll be pulling it off anyways.
 
never done it in place. Suspect it is pretty straight forward-attach hoist to fwd part of engine, remove two lower motor mount bolts and lift fwd part of engine about an inch. rubber bushings fall out and suspect the pan will drop straight down the studs. May need to loosen upper mount bolts to get enough movement.

Larry
 
Last edited:
Before you try gasket replacement, clean that area really well with some MEK or Acetone. Blow out the crack area really well and then I would mix up some pro-seal and use that to seal up the area. Get a small little squeegee and really work the sealant into the crack. Then I would apply a cover bead of sealant over that area, expanding beyond the leaking area by several inches. I have some luck on spots on the engines sealing up leaks with proseal. RTV is not a good sealant in this application. You may even want to get the paint off that area and really scour it to get good adhesion. Let it cure for a few days and then go flying. If it holds-great. If not, scrape it off and do the gasket change. You can hoist up your engine and pull the bottom ears off the oil sump. I wouldn't try and clean up the faces with anything in place as you can get some gasket contaminants into the sump and then you'll be pulling it off anyways.
I tried cleaning and tried the Pro Seal. I did not try to squeegee into the gasket. It helped, but still oil weeps down onto the airbox between the 2 bolts shown in pic.
 
I would make sure you don't have a leak on one of the cylinder oil return lines, at the rubber connector hoses...making it look like the flange of the pan is leaking.
 
I would make sure you don't have a leak on one of the cylinder oil return lines, at the rubber connector hoses...making it look like the flange of the pan is leaking.
Took care of that early on. They are all dry.
 

Attachments

  • IMG_4626.png
    IMG_4626.png
    11 MB · Views: 9
This may be a really dumb question. Have you checked the torque on the bolts/nuts on the pan? I would go around it and make sure they are all up to about 80-85in/lbs. I've had some engines that had a little leak and found out that some of the bolts were not that tight. Sometimes on newer engines after they are ran for a bit and heated up, you can have the gasket settle a bit and it takes a little off the total torque of the bolt/nut. That spot is a known area of issue because of the case halves coming together right there and the silk thread that is used to gasket the case halves. If the person that was putting together your engine doesn't cut that off flush with a razor and then use a small amount of hylomar to seal the joint on the face of the case, the thread could be wicking oil through there. If it you can't get it to stop, then bite the bullet and pull the pan and start over.
 
This may be a really dumb question. Have you checked the torque on the bolts/nuts on the pan? I would go around it and make sure they are all up to about 80-85in/lbs. I've had some engines that had a little leak and found out that some of the bolts were not that tight. Sometimes on newer engines after they are ran for a bit and heated up, you can have the gasket settle a bit and it takes a little off the total torque of the bolt/nut. That spot is a known area of issue because of the case halves coming together right there and the silk thread that is used to gasket the case halves. If the person that was putting together your engine doesn't cut that off flush with a razor and then use a small amount of hylomar to seal the joint on the face of the case, the thread could be wicking oil through there. If it you can't get it to stop, then bite the bullet and pull the pan and start over.
1st thing was checking the torque @96 in/lbs. A few may have tightened an 1/8 of a turn. However, with the top/bottom mounts tight, there is probably no movement between the halves.
 
Looks like a good product, but the gasket goes on dry. I think my gasket is/was compromised in one spot. Looks that would be a nightmare without removing the engine, if it didn’t work or had to be replaced again.
I never install gaskets dry, and Hylomar is my go-to.
 
This may be a really dumb question. Have you checked the torque on the bolts/nuts on the pan? I would go around it and make sure they are all up to about 80-85in/lbs. I've had some engines that had a little leak and found out that some of the bolts were not that tight. Sometimes on newer engines after they are ran for a bit and heated up, you can have the gasket settle a bit and it takes a little off the total torque of the bolt/nut. That spot is a known area of issue because of the case halves coming together right there and the silk thread that is used to gasket the case halves. If the person that was putting together your engine doesn't cut that off flush with a razor and then use a small amount of hylomar to seal the joint on the face of the case, the thread could be wicking oil through there. If it you can't get it to stop, then bite the bullet and pull the pan and start over.
I bit the bullet and changed the sump gasket . All 4 engine mounts had to come off to open the case like a clam, from front to back to get the top high enough to clear the studs. You can only lower @1/2” due to the cross bar under the rear of the sump, while trying to keep the sump level. I made a tail stand so the tail didn’t come crashing down when the hoist was raising the engine.

The RVv10 must have the easiest engine mounts to install, even solo. (Less than 2 hrs) Bottoms on 1st, use hoist from front pivot, lower hoist, install top mounts. Torque, cotter pin and done. I realize Lycoming went to metal locknuts on the mounts. Now, reassemble intake, exhaust with new gaskets and test for leaks. I hope Hylamar is not in my future.
 

Attachments

  • IMG_5378.jpeg
    IMG_5378.jpeg
    1.9 MB · Views: 17
I bit the bullet and changed the sump gasket . All 4 engine mounts had to come off to open the case like a clam, from front to back to get the top high enough to clear the studs. You can only lower @1/2” due to the cross bar under the rear of the sump, while trying to keep the sump level. I made a tail stand so the tail didn’t come crashing down when the hoist was raising the engine.

The RVv10 must have the easiest engine mounts to install, even solo. (Less than 2 hrs) Bottoms on 1st, use hoist from front pivot, lower hoist, install top mounts. Torque, cotter pin and done. I realize Lycoming went to metal locknuts on the mounts. Now, reassemble intake, exhaust with new gaskets and test for leaks. I hope Hylamar is not in my future.
Awesome. Sometimes the procrastination is the longest part of the job. Once you know what you need to do, just get after it. I should take that advice myself!
 
Back
Top