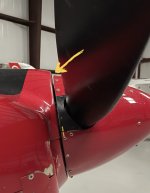
For context, I’m the second owner of a RV-8 and haven’t built an RV. I’m getting ready to do some fiberglass work on my cowl to clean up some lines and design a better cowl hinge pin cover. In the process of looking the project over I noticed the cowl doesn’t align with the nose cone. I’m assuming this has to be causing some drag with a loss of a knot or two and at minimum doesn’t look good. Is this a common alignment issue and what have others done to get the lines to match up?

Van's Air Force
You are using an out of date browser. It may not display this or other websites correctly.
You should upgrade or use an alternative browser.
You should upgrade or use an alternative browser.
Cowl to nose cone alignment
- Thread starter ntspdy
- Start date

Kyle Boatright
Well Known Member
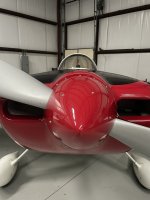
So, the spinner is sitting a little low. That means your engine is sagging relative to the cowl. You can add shims (big washers) between the lower engine isolators and the engine to re-align it. Alternately, if the aircraft is older, maybe the engine isolators are worn and contributing to the engine sag. If that's the case, you may want to replace the engine isolators. But either way, it comes down to the engine isolators. They are the only adjustment you have without reworking the cowl.
I was wondering if this was the case but if I raise the engine to make the spinner match the cowl on the top this would result in the same misalignment just now on the bottom of the cowl. As it is right now the spinner and cowl match perfectly on the bottom. I’ll give the engine mounts a good examination the next time I pull the cowl but how quickly do they usually start to show sag? This plane was finished in 2015 and photos I have of it when it was completed show the same misalignment back in ‘15. I’m not sure when the engine was hung though.
Last edited:
D-Dubya
Well Known Member
If the engine mounts are worn, now would be the time to replace them before any cowling work was done. That's a bit of a project in itself, but it's achievable in a weekend. If they are quality mounts and in good shape, it's probably not worth the effort and cost to replace them. Especially if the pics look the same from nine years ago.
It's hard to tell from the photos, but it may be possible that the original builder didn't sand the cowling halves down far enough for the cowling outline to match the spinner diameter. You're looking at a LOT of work to do that, as the geometry of how the cowling matches the fuselage changes as the nose is sanded down. It's kind of hard to visualize if you haven't done it, but you sand a little here, then a little there to match. If you're not an experienced builder and don't have any experience with fiberglass, this would not be my first choice of a project. You'll also almost certainly have to repaint the entire cowling, so there's that to think about as well.
If the aesthetics bothers you and want to do it, go for it. But I'd really recommend you get a builder with some experience fitting a cowling to help. It might help save you a lot of frustration and potentially some costly mistakes. At a minimum, find a few builders' websites where they thoroughly document the fitting process of the cowling. It'll help you visualize the process and understand what needs to be done.
Laird
Well Known Member
I had a similar problem as time went on. I just shimmed the lower motor mount with slotted washers so I didn't have to pull the bolt all the way out.
The gap change at the bottom of the ring is less noticeable than the spinner alignment to the top of the cowl.
The gap change at the bottom of the ring is less noticeable than the spinner alignment to the top of the cowl.
Last edited:
Kyle Boatright
Well Known Member
So your choices boil down to 1) Do nothing. 2) Shim the engine isolators to make the spinner match the top of the cowl. 3) Do a lot of rework on the cowl. Personally, I'd skip #3 and evaluate the time/effort/aesthetics between options 1 and 2. Given that shimming the bottom isolators is a relatively easy job, I'd probably do that. The aesthetic improvement (top of spinner matching the cowl) would be worth it to me.I was wondering if this was the case but if I raise the engine to make the spinner match the cowl on the top this would result in the same misalignment just now on the bottom of the cowl. As it is right now the spinner and cowl match perfectly on the bottom. I’ll give the engine mounts a good examination the next time I pull the cowl but how quickly do they usually start to show sag? This plane was finished in 2015 and photos I have of it when it was completed show the same misalignment back in ‘15. I’m not sure when the engine was hung though.
JonJay
Well Known Member
I haven’t done the shims. I anticipated sag, and set my top gap to about 1/8” and bottom to 3/8”. It never sagged.
1/8” is really tight. It works but….
So, for those that have done this, my concern with this fix for the OP is it appears to be needing to move up a lot. Won’t the gap between the top cowl and spinner get tight? ….
1/8” is really tight. It works but….
So, for those that have done this, my concern with this fix for the OP is it appears to be needing to move up a lot. Won’t the gap between the top cowl and spinner get tight? ….
ronrapp
Well Known Member
How does 1/8" work during aerobatics? I'd think the engine would move enough to put the spinner into contact with the cowling...I haven’t done the shims. I anticipated sag, and set my top gap to about 1/8” and bottom to 3/8”. It never sagged.
1/8” is really tight. It works but….
JonJay
Well Known Member
Surprisingly, it is rock solid. I only do positive G’s and never pulled beyond 4 or so. No witness marks from spinner contact, 900 hours.How does 1/8" work during aerobatics? I'd think the engine would move enough to put the spinner into contact with the cowling...
It’s just a bit trickier getting the cowling on and off but not a big deal. Still, I wouldn’t recommend that tight of a gap. I was shooting for 1/4” all the way around. I would suggest that is still a bit tight.
I am still surprised the mount never settled, not even a little.
Kyle Boatright
Well Known Member
Yes. Especially if you have a heavy prop and plan on pulling many G’s. Both of those contribute to engine sag.Would it be advisable to set the spinner slightly high to allow for sag later?
erich weaver
Well Known Member
That’s what I did. Engine sag appeared relatively quickly after mounting, within a month or so I think, and in my case worked out very nicely.Would it be advisable to set the spinner slightly high to allow for sag later?
planenutz
Well Known Member
I have exactly the the same situation as the OP.
This is something I should have picked up during the cowling fitment as the easiest way to correct this is by trimming the mating faces of the top cowling along its horizontal edge. Sadly I didn't pick up the misalignment until after the aircraft was painted and I was doing the final assembly. I was pretty annoyed and also embarrassed by this break in what would ordinarily be a beautiful smooth line. I contemplated reworking the cowl and I looked at the option of adding a washer under the lower engine mounts... and in the end just went flying. I now have the washers on hand and will look at fitting them at the 200 hour inspection, due in another 4 months time. Hopefully this will reduce the eye-catching jump in the tranistion from Spinner to Cowling and at the same time give me another knot. (I seriously doubt it will make any difference at all, but it will make me feel better.)
This is something I should have picked up during the cowling fitment as the easiest way to correct this is by trimming the mating faces of the top cowling along its horizontal edge. Sadly I didn't pick up the misalignment until after the aircraft was painted and I was doing the final assembly. I was pretty annoyed and also embarrassed by this break in what would ordinarily be a beautiful smooth line. I contemplated reworking the cowl and I looked at the option of adding a washer under the lower engine mounts... and in the end just went flying. I now have the washers on hand and will look at fitting them at the 200 hour inspection, due in another 4 months time. Hopefully this will reduce the eye-catching jump in the tranistion from Spinner to Cowling and at the same time give me another knot. (I seriously doubt it will make any difference at all, but it will make me feel better.)
Attachments
Last edited:
I ordered new mounts a few months ago to cure this same sagging issue on my -6. They have been on back order forever, I’m told another two months out still. I couldn’t wait that long so I went ahead and installed a shim in the lower mounts. It’s not perfect but helped a little, I have longer bolts and more shims but I’m not doing that job again until my new isolators get here.. if it hasn’t been mentioned, all metal lock nuts will be your friend when it comes to reinstalling the shims or new isolators. If you shim you’ll need longer bolts too.
JonJay
Well Known Member
There are two issues here. Cowls that where built with the spinner well below the top of the cowl. Engine mounts that have compressed allowing the engine and spinner to drop down and out of alignment.
While those two issues may occur together, they may be different fixes.
If the spinner drops due to mounts changing, the top gap between spinner and cowl should grow. The bottom shrink. Right?
If the spinner was aligned, shims will bring it back into alignment. This has been proven.
If the cowl was built so the spinner sits below the cowl, and the spinner was square to the cowl face, shimming may bring the spinner up, but it will no longer be square with the cowl.
These are more questions than answers as nobody has chimed in that fixed a cowling where by it started off too low.
This is exactly what I tell myself when I look at the 1/16" - 1/8" difference between my cowl and my spinner on the ground. I hope it's true, and while I considered mounting a camera on the cowl to check it in flight, I decided I didn't really want to know the answer to that question!In flight the prop thrust pulls up and to left slightly as I recall. In flight that gap would be reduced relative to the plane sitting static on the ground.
Would be interesting to power it up on the ground a watch what happens to that gap, from safe distance of course.
")
akarmy
Well Known Member
Just adds character!
Curious from someone who has added the shims how much the spinner gap tightens at the top and grows at the bottom?
Maybe it doesn’t, or is minimal, but it seems like it should.
I added 1 large washer on the lower engine to mount location. It raised the top 1/4" in height. The gap at the top remained almost unchanged (maybe just the slightest bit tighter but not much) and the bottom of the spinner opened up about 3/16".
Before
After shimming
This is what I’m looking for. I appreciate all the info everyone has posted but going through the photos of when the plane was initially built through today it looks like the cowl was not built to match the spinner.These are more questions than answers as nobody has chimed in that fixed a cowling where by it started off too low.
I’m still considering options to include pulling the top cowl, removing the lateral piano hinge, sanding to fit, then reinstalling the piano hinge but this seems like a lot. This also opens up the possibility for fitment issues at the back of the cowl. I’m not happy with the straightness or lack thereof of the cut between the top and bottom cowl so doing this would help that issue.
The other wild idea I had was cutting the bump in the upper cowl for the spinner out, trimming to bring it down then fiberglassing it all back in. I wouldn’t need to redo the piano hinge or baffles by doing it this way. I’m planning to repaint the cowl anyways so that isn’t a problem.
PaulvS
Well Known Member
I've just completed fitting the cowl to my -6A and the plans call for the cowl top to be 1/8" below the spinner, per the attached pic.

Since this photo was taken I've done some extensive fiberglass work on the front of the cowl to make the 1/4" parallel gap between the spinner and the cowl.

In your case, presuming that the cowl was never aligned in this way, the geometry of the cowl would require the aft (firewall) hinges to be removed and the cowl reworked around the firewall to get it realigned. There would be fiberglass work involved, scarf joints etc., mainly around the firewall end. The baffle seal would need to be trimmed or replaced and maybe the aluminum baffling would need trimming, depending on the gaps. I think it would not be particularly difficult, it is just systematic work as per the initial fitting.
It will be possible to get an idea of how much the back edge will need to be modified by removing the bottom half and holding the top half in correct position (just as would be done during the initial fitting process).
Since this photo was taken I've done some extensive fiberglass work on the front of the cowl to make the 1/4" parallel gap between the spinner and the cowl.
In your case, presuming that the cowl was never aligned in this way, the geometry of the cowl would require the aft (firewall) hinges to be removed and the cowl reworked around the firewall to get it realigned. There would be fiberglass work involved, scarf joints etc., mainly around the firewall end. The baffle seal would need to be trimmed or replaced and maybe the aluminum baffling would need trimming, depending on the gaps. I think it would not be particularly difficult, it is just systematic work as per the initial fitting.
It will be possible to get an idea of how much the back edge will need to be modified by removing the bottom half and holding the top half in correct position (just as would be done during the initial fitting process).
Last edited:
D-Dubya
Well Known Member
That's actually not that wild of an idea. The misalignment obviously bothers you and you want it to look right. In the whole scheme of things, cutting the profile of the upper cowl--while leaving it attached a foot or so back from the spinner to help maintain alignment--may be the least amount of work and have less risk. It would kind of be like a cowling facelift. You're still in an area that's very visible and people like to caress those curves (for whatever reason). Getting it right will involve a lot of filling and sanding, but it's definitely an option.The other wild idea I had was cutting the bump in the upper cowl for the spinner out, trimming to bring it down then fiberglassing it all back in. I wouldn’t need to redo the piano hinge or baffles by doing it this way. I’m planning to repaint the cowl anyways so that isn’t a problem.
Every RV I have installed a cowl on (probably about 20 or so at this point) the engine has had the position of the spinner sag a minimum of about 1/8" after the airplane accumulates some hours.Mine never sagged. Hartzell CS and lots of aerobatics. Go figure.
Not sure why there is a small minority of people that say theirs never has....
JonJay
Well Known Member
Honestly, an 1/8” I probably just didn’t notice. You would know. It didn’t drop as much as I was lead to believe when I built it but it all worked out.Every RV I have installed a cowl on (probably about 20 or so at this point) the engine has had the position of the spinner sag a minimum of about 1/8" after the airplane accumulates some hours.
Not sure why there is a small minority of people that say theirs never has....
It looks perfect in your photo.Honestly, an 1/8” I probably just didn’t notice. You would know. It didn’t drop as much as I was lead to believe when I built it but it all worked out.
View attachment 57501
Do you remember if you followed the plans and positioned the cowl with it just slightly high during the cowling installation?
JonJay
Well Known Member
Let’s see, 20 plus years ago,….. errr, uhhh, sure!It looks perfect in your photo.
Do you remember if you followed the plans and positioned the cowl with it just slightly high during the cowling installation?
….What surprises me is how little the gap seems to move. I would expect the top gap to grow as the engine “sags”. I do remember angling the spinner slightly off parallel to the cowl so it would be square to the cowl when it settled
It’s still slightly off parallel, and the top gap is small.
Looks to be about what is typical…. Between 1/8 and 3/16 inchI replaced the engine mounts on my RV-8 at 1375 Hobbs Hours.
Before:

Before:

After. This pic was taken right after the mounts were installed. It has sagged just a teeny smidge with 60 hours on them.


