
Van's Air Force
You are using an out of date browser. It may not display this or other websites correctly.
You should upgrade or use an alternative browser.
You should upgrade or use an alternative browser.
Automotive alternator
- Thread starter FrenchRV8
- Start date

Hi,
I got an automotive alternator for my O-360 Lycoming .
The issue is that Vertical Power is not compatible, Field connection simply doesnt exist at the rear of the alternator.
Has anyone dealed with that?
Great thanks
Dominique
Salut Dominique, welcome to VAF!
There are several different types of alternators that can work fine. I don't know exactly what the Vertical Power box expects, but I suspect that you can make most alternators work ok. Here are some hints:
https://www.kitplanes.com/alternator-woes/
If this doesn't become more clear, perhaps post some pictures of the alternator and the connector. Many alternators have small wiring diagram on the alternator body. Best of luck!
Here is the alternator I use it has a field connection on the back of it
http://www.ase-supply.com/product_p/nd-021080-0760.htm
Field plug and wire
https://bandc.com/product/replaceme...-alternators-l-40-bc410-h-bc425-h-sk35-lom30/
O-320 mounting kits
BOSS mount kit https://bandc.com/product/replaceme...-use-with-single-groove-flywheel-pulley/#belt
CASE mount kit
https://bandc.com/product/replaceme...case-mount-for-use-with-brand-x-starter/#belt
Attachments


Last edited:
Sam Buchanan
been here awhile
Looks like Dominique has what is commonly known as a "one-wire" alternator. They are popular in the custom and retro automotive community (have one on my '48 Plymouth) and just have one wire that connects to the battery bus. I don't know how this would be incorporated into our aircraft wiring architecture, might be better to use a conventional "field" alternator instead for full control.
FireMedic_2009
Well Known Member
1-wire n 3-wire alternators
If the vertical power is looking to shut down the B-lead if voltage runaway occurs then use a 3-wire alternator. I have heard that it is possible for the voltage regulator can fail in such a way that the field wire is unable to shut down the B-lead. The best thing is to put a contactor for the alternator so you can physically disconnect the B-lead from the bus. If you use the contactor then you can still use the 1-wire alternator
If the vertical power is looking to shut down the B-lead if voltage runaway occurs then use a 3-wire alternator. I have heard that it is possible for the voltage regulator can fail in such a way that the field wire is unable to shut down the B-lead. The best thing is to put a contactor for the alternator so you can physically disconnect the B-lead from the bus. If you use the contactor then you can still use the 1-wire alternator
Salut Dominique, welcome to VAF!
There are several different types of alternators that can work fine. I don't know exactly what the Vertical Power box expects, but I suspect that you can make most alternators work ok. Here are some hints:
https://www.kitplanes.com/alternator-woes/
If this doesn't become more clear, perhaps post some pictures of the alternator and the connector. Many alternators have small wiring diagram on the alternator body. Best of luck!
thanks, very interesting
Looks like Dominique has what is commonly known as a "one-wire" alternator. They are popular in the custom and retro automotive community (have one on my '48 Plymouth) and just have one wire that connects to the battery bus. I don't know how this would be incorporated into our aircraft wiring architecture, might be better to use a conventional "field" alternator instead for full control.
I think you are right, that's not compatible with Vertical power .
Perhaps the best would be to buy B and C with field connection.
Here is the alternator I use it has a field connection on the back of it
http://www.ase-supply.com/product_p/nd-021080-0760.htm
Field plug and wire
https://bandc.com/product/replaceme...-alternators-l-40-bc410-h-bc425-h-sk35-lom30/
O-320 mounting kits, not sure if the O-360 is the same https://bandc.com/product/replaceme...-use-with-single-groove-flywheel-pulley/#belt
https://bandc.com/product/replaceme...case-mount-for-use-with-brand-x-starter/#belt
Very cheap alternator installation
thanks
Here is the alternator I use it has a field connection on the back of it
http://www.ase-supply.com/product_p/nd-021080-0760.htm
Field plug and wire
https://bandc.com/product/replaceme...-alternators-l-40-bc410-h-bc425-h-sk35-lom30/
O-320 mounting kits, not sure if the O-360 is the same https://bandc.com/product/replaceme...-use-with-single-groove-flywheel-pulley/#belt
https://bandc.com/product/replaceme...case-mount-for-use-with-brand-x-starter/#belt
I think these informations are very useful to me , thanks a lot for your help.
Here is the alternator I use it has a field connection on the back of it
http://www.ase-supply.com/product_p/nd-021080-0760.htm
Field plug and wire
https://bandc.com/product/replaceme...-alternators-l-40-bc410-h-bc425-h-sk35-lom30/
O-320 mounting kits, not sure if the O-360 is the same https://bandc.com/product/replaceme...-use-with-single-groove-flywheel-pulley/#belt
https://bandc.com/product/replaceme...case-mount-for-use-with-brand-x-starter/#belt
@Ruready, so I bought this alternator you recommended and it's A COMPLETELY different mounting ear than the BNC L-40... it's not even close.. the L40 has basically 3 mounting points and this one has two and does not mount the same... Having a lot of difficulty trying to fit this to an O-320 and now doesn't seem worth it... am Wary of trusting 2 mounting points on this one you recommended, not to mention the built in regulator interferes with the motor mount bracket bolts
@Ruready, so I bought this alternator you recommended and it's A COMPLETELY different mounting ear than the BNC L-40... it's not even close.. the L40 has basically 3 mounting points and this one has two and does not mount the same... Having a lot of difficulty trying to fit this to an O-320 and now doesn't seem worth it... am Wary of trusting 2 mounting points on this one you recommended, not to mention the built in regulator interferes with the motor mount bracket bolts
Yes, that's very clear in the order picture....

@Ruready, so I bought this alternator you recommended and it's A COMPLETELY different mounting ear than the BNC L-40... it's not even close.. the L40 has basically 3 mounting points and this one has two and does not mount the same... Having a lot of difficulty trying to fit this to an O-320 and now doesn't seem worth it... am Wary of trusting 2 mounting points on this one you recommended, not to mention the built in regulator interferes with the motor mount bracket bolts
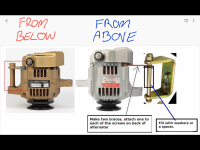
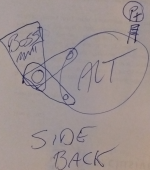
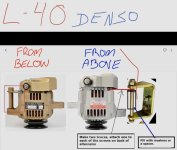
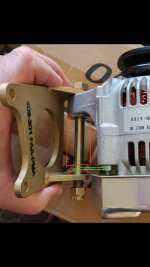
Its the same alternator, flip it over, the L40 is reclocked 180 degrees, its the same case, if you want the 3 point than make it, you get a spacer or use washers and two pieces of metal to mount on the back of the alternator, seriously its simple.
Do you have the boss mount like the picture here or the case mount? I have this mounted on two planes, I made the 3 point mount using washers as the spacer and used two metal braces attached to the back like the L-40 spacer uses.
I didnt think anyone would not be able to see its reclocked, the 3 point brace is mounted on the side it fits on and works perfect.
Attachments


Last edited:
not to mention the built in regulator interferes with the motor mount bracket bolts
If you flip the alternator upside down and mount it like the L40 is mounted your problems will be gone. You have to make the 3 point brace like they did, that little spacer with the brace that attaches to the alternator on the back did not come that way from Denso, they made it, it's a lightweight small brace they took the two nuts off the back of the alternator and attached the spacer brace and put the nuts back on.
The Desno will have the charge terminal on the top when mounted on engine, instead of the bottom, this is better, you are not close to the exhaust.
This is simple stuff, think like Henry Ford did in when making the Model T, google doesn't have to do everythink
Attachments
Last edited:
FireMedic_2009
Well Known Member
Y’all are beating a dead horse. He doesn’t need another alternator. Put a alternator contactor on the firewall and use the vertical power to control it to shut down the B lead. The whole purpose of the vertical power in regard to the alternator is to shut down the B-lead. The best way is to physically disconnect the B-lead from the system through the contactor.
Last edited:
@Ruready, so I bought this alternator you recommended and it's A COMPLETELY different mounting ear than the BNC L-40... it's not even close.. the L40 has basically 3 mounting points and this one has two and does not mount the same... Having a lot of difficulty trying to fit this to an O-320 and now doesn't seem worth it... am Wary of trusting 2 mounting points on this one you recommended, not to mention the built in regulator interferes with the motor mount bracket bolts
I hope that cleared up the mounting ear problem you were having and you can now see that it's exactly the same case and no different
ravisurdhar
I'm New Here
Here is the alternator I use it has a field connection on the back of it
http://www.ase-supply.com/product_p/nd-021080-0760.htm
Field plug and wire
https://bandc.com/product/replaceme...-alternators-l-40-bc410-h-bc425-h-sk35-lom30/
O-320 mounting kits, not sure if the O-360 is the same https://bandc.com/product/replaceme...-use-with-single-groove-flywheel-pulley/#belt
https://bandc.com/product/replaceme...case-mount-for-use-with-brand-x-starter/#belt
Ruready, any idea if I could use this as a drop-in replacement for the PlanePower AL12-EI60/B I currently have on my RV-10? https://www.aircraftspruce.com/catalog/eppages/lightweight_alternator3.php
From a first glance it seems like the plugs are different and the pulley wheel is a slightly smaller diameter on mine, but otherwise they seem identical. Changing my plug is easy, but would the pulley wheel be an easy swap?
Cant be of help to you, never liked pp, I went from a failing generator to this Denso. I am not a fan of outrageously priced stc equipment. [political text deleted; S.Buchanan] My 57 Cessna had an generator to alternator conversion done back in the early 1970s and just logbook entry and 337 was all it took to swap out the gen for a 1968 stock alternator system. Today you have to pay out your ears for an stc and buy special highly overpriced junk. The old way was better, no stc just a simple swap of parts and 337, boom done.
Last edited by a moderator:
@Ruready, so I bought this alternator you recommended and it's A COMPLETELY different mounting ear than the BNC L-40... it's not even close.. the L40 has basically 3 mounting points and this one has two and does not mount the same... Having a lot of difficulty trying to fit this to an O-320 and now doesn't seem worth it... am Wary of trusting 2 mounting points on this one you recommended, not to mention the built in regulator interferes with the motor mount bracket bolts
Sdrojan must have got it figured out, hopefully he will put a picture of his install on the thread to help out others
Last edited:
@ruready, thank you for the info! I could see it was the same case... have gone through a month of headaches and downtime trying to get help and machine shops to help me out... I don't have a machine shop, the alternator shop guys looked at me like we won't make you a bracket and why the **** would you do that? Unbelievably frustrating process... thank you for the diagrams.
Still stuck at the moment, Alternator shop sold me a 2nd Denso (55amp) that is more like the kubota alternator that came off the O-320... had to get a longer belt for that one to get it away from the prop oil line, had to pull the prop, which then maxxed out the tensioner bracket, then had to add a larger pulley... and of course the cost will wind up being more than if I just bought the full L-40 kit from B&C... sorry, wish I had more machine shop folks to help me around KMYF
Still stuck at the moment, Alternator shop sold me a 2nd Denso (55amp) that is more like the kubota alternator that came off the O-320... had to get a longer belt for that one to get it away from the prop oil line, had to pull the prop, which then maxxed out the tensioner bracket, then had to add a larger pulley... and of course the cost will wind up being more than if I just bought the full L-40 kit from B&C... sorry, wish I had more machine shop folks to help me around KMYF
Attachments

Last edited:
@ruready, thank you for the info! I could see it was the same case... have gone through a month of headaches and downtime trying to get help and machine shops to help me out... I don't have a machine shop, the alternator shop guys looked at me like we won't make you a bracket and why the **** would you do that? Unbelievably frustrating process... thank you for the diagrams.
Still stuck at the moment, Alternator shop sold me a 2nd Denso (55amp) that is more like the kubota alternator that came off the O-320... had to get a longer belt for that one to get it away from the prop oil line, had to pull the prop, which then maxxed out the tensioner bracket, then had to add a larger pulley... and of course the cost will wind up being more than if I just bought the full L-40 kit from B&C... sorry, wish I had more machine shop folks to help me around KMYF
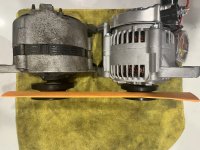
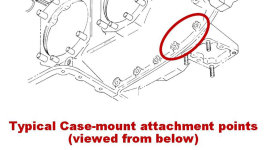
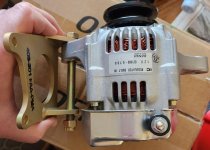
The Denso bolts on with no machining necessary, exactly the same as the L-40. Bolts right up to the boss mount, a simple job. If you are having a problem with the Denso I linked than you would have the same problem with the L-40, it’s identical, look at the picture I posted above of the bottom view L-40 next to the above view of the Denso. Either you did not order the Denso I linked or your mounting is not the standard boss mount. Post pics and I can try to help. Neither of the two alternators in your picture would mount to my stock o320 boss mount.
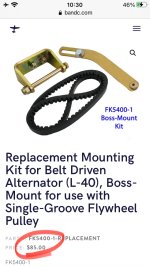
Did you buy the L-40 mounting kit I said was required and also linked? The alternator is $128. and the boss mount kit is $85. https://bandc.com/product/replaceme...-use-with-single-groove-flywheel-pulley/#belt
I had this mounted in an hour, no line up problems at all.
Attachments
Last edited:
@ruready, thank you for the info! I could see it was the same case... have gone through a month of headaches and downtime trying to get help and machine shops to help me out... I don't have a machine shop, the alternator shop guys looked at me like we won't make you a bracket and why the **** would you do that? Unbelievably frustrating process... thank you for the diagrams.����
Still stuck at the moment, Alternator shop sold me a 2nd Denso (55amp) that is more like the kubota alternator that came off the O-320... had to get a longer belt for that one to get it away from the prop oil line, had to pull the prop, which then maxxed out the tensioner bracket, then had to add a larger pulley... and of course the cost will wind up being more than if I just bought the full L-40 kit from B&C... sorry, wish I had more machine shop folks to help me around KMYF
I looked closer at your picture attached below, neither of these alternators in your picture are anything like the L-40 or Denso that I linked to. Are you using the boss mount like in the kit I linked from B&C, or another mount?
One of your alternators looks like a different model Denso than the one I linked, the mount lugs are not the same as the L-40 or Denso I linked, its no wonder you are having problems. I have this installed on two planes using the L-40 boss mount kit I linked above for $85 and the Denso alternator I linked, both on fixed pitch prop O320 A2B engines and it went on with no problems.
Attachments
Last edited:
climberrn
Well Known Member
Overvoltage
My plane was AOG 5 hours away from my house for 5 weeks from an over voltage incident. The engine came with an automotive style alternator that once energized, could not be shut off.
Damaged parts:
Both Dynon screens, headsets (lemo powered), autopilot panel, both P-Mags, Dynon EMS, and probably more things I forgot about. Cost me much more than getting a B&C alternator from the start. All parts needed to be sent off and changed at a field far away.
My OV incident is not common, but it's not worth taking chances. If you are spending money on a fancy Vertical Power system, consider spending a little more on an aircraft alternator with OV protection.
Last edited:
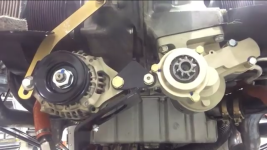
Here is a picture of the b and c installed only difference is he has the case mount instead of the boss mount, I have the case on one and boss on another. https://m.youtube.com/watch?v=TW8x3Brh7IE
Here is the Denso fitted onto the case mount instead of the boss mount, for my sisters plane going on this summer. It bolts to the case just like the screenshot of the YouTube video of the Franklin Super Cub showing the BnC, it is simple, cheap and works great. The case mount has the added starter brace on it. I am not sure how your prop oil line interferes with the mounting and need for the pulley change, or why you had to have a machine shop modify yours, but hope this helps, mine have all bolted right up, all I did was make the small braces that attach to the back of the alternator and the an6 bolt and than added washers for the spacer
Attachments
-
 573534CD-36B7-4DC6-99BD-888FCD8FAE31.png455.7 KB · Views: 83
 -
 50DC0644-95EB-4897-8379-A97FDE974312.jpg330.5 KB · Views: 102
 -
 BF217841-3718-4FD8-9B6A-BF5386935C7D.jpeg124.8 KB · Views: 100
 -
 5B15A2FC-0513-46E6-B2C3-51E8309F8F06.jpeg124.9 KB · Views: 81
 -
 831E74CF-9F08-400F-879A-C79C2957DB0D.png1.2 MB · Views: 107
Last edited:
Mark33
Well Known Member
60 amp/internally regulated?
So I’m assuming this Denso is 60 amp/internally regulated? I have a PP 60 amp on my -8. It’s down for maintenance right now and this has me thinking about doing a preemptive strike and swapping everything out for this setup. Also, would a pulley change need to be made? If so, to which one and where could one be obtained?
So I’m assuming this Denso is 60 amp/internally regulated? I have a PP 60 amp on my -8. It’s down for maintenance right now and this has me thinking about doing a preemptive strike and swapping everything out for this setup. Also, would a pulley change need to be made? If so, to which one and where could one be obtained?
Last edited:
Mark33
Well Known Member
The one I posted is 40 amp, you would have to compare the case to see if a 60 amp Denso will fit the same mounting kit. Do you need more than 40 amps?
I can probably get away with a 40 amp, but I’ll do a little research to see if they make a 60 amp in that same case.
Mark33
Well Known Member
The 60amp 2850 sure looks the same as the 40amp 0760, I'm just trying to confirm it with dimensions.
You might be able to go to your local NAPA and see if they have one that they’ll let you look at a measure. Keep us posted.
dpansier
Well Known Member
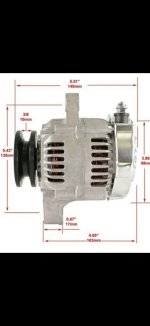
The 40 amp Denso dimensions, 5.5" center hole to center hole and 6.75" outside edge lug to outside opposite lug.
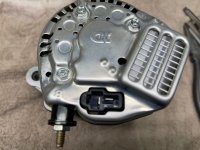
Can the Alternator brush end case be re clocked 180 degrees? This would place the output stud in the same position as the PP alternator.
This is how its clocked from the factory, POS term is 12 oclock, that dimension pic is not clocked correct. I tried to get mine apart and it was tight, Im sure it has to come apart though and it can be reclocked, but I would say PP is backwards
Attachments

Last edited:
Can the Alternator brush end case be re clocked 180 degrees? This would place the output stud in the same position as the PP alternator.
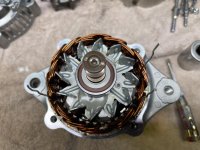
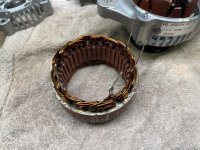
Yes it can, but first the windings must be re-clocked in the other case half. Take pictures before disassembly.
First carefully uncurl the 4 winding leads attached under terminal screws on the regulator. Straighten each lead using needle nose pliers. Remove the regulator. Make a reference mark on case, and winding, then another mark on the case where you plan to move the winding to for clocking (180 Deg).
To remove the windings from the case half you may have to apply torch heat first to remove the bearing then flame to each side at the 2 mounting ears locations for a short amount of time maybe 10 seconds each. Take care to keep flame away from windings. The heat will expand the case, and with a gloved hand you should be able to remove.
After testing the clocking position, and confirming case bolts position, windings line up with 4 holes in back half of case then reassemble in reverse using moderate heat to reinstall bearing, and windings.
Thanks to a friend of mine who is an A&P, RV Builder, Machinist mechanic taught me how to do this. The link RUREADY shared for the Denso alternator is the alternator we used. Note: We discovered the China copy of Denso alternator was not of the same quality and tolerance as the Denso. Torch was not needed to remove bearing, and windings on copy. If it does not have ND stamped on the back cover, then it probably is a China copy. Your choice Japan or China, either will probably work. The ND 14684 for the 1987 Suzuki Samurai seems to only be available now in the China copy.
Last edited:
BillL
Well Known Member
Nail on the head!!
Good post Roger, well stated!!
Yes it can, but first the windings must be re-clocked in the other case half. Take pictures before disassembly.
First carefully uncurl the 4 winding leads attached under terminal screws on the regulator. Straighten each lead using needle nose pliers. Remove the regulator. Make a reference mark on case, and winding, then another mark on the case where you plan to move the winding to for clocking (180 Deg).
To remove the windings from the case half you may have to apply torch heat first to remove the bearing then flame to each side at the 2 mounting ears locations for a short amount of time maybe 10 seconds each. Take care to keep flame away from windings. The heat will expand the case, and with a gloved hand you should be able to remove.
After testing the clocking position, and confirming case bolts position, windings line up with 4 holes in back half of case then reassemble in reverse using moderate heat to reinstall bearing, and windings.
Thanks to a friend of mine who is an A&P, RV Builder, Machinist mechanic taught me how to do this. The link RUREADY shared for the Denso alternator is the alternator we used. Note: We discovered the China copy of Denso alternator was not of the same quality and tolerance as the Denso. Torch was not needed to remove bearing, and windings on copy.
Good post Roger, well stated!!
Hi Ruready,
On the above photo that you posted, what is the thickness of the steel of the B&C mounting bracket? Is it 3/16" or 1/4"?
Thanks,
Phil
I think it’s 1/4, thick stuff. That’s an AN6 bolt that comes with the kit, 3/16 would be half the size of that bolt, it’s more than half the size.
To remove the windings from the case half you may have to apply torch heat first to remove the bearing then flame to each side at the 2 mounting ears locations for a short amount of time maybe 10 seconds each. Take care to keep flame away from windings. The heat will expand the case, and with a gloved hand you should be able to remove.
No wonder I couldn't get mine apart I didn't have heat to apply to it at the time
dpansier
Well Known Member
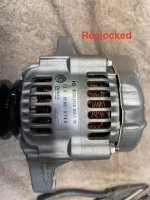
Following Rogers instructions, I re-clocked the alternator rear housing to place the output stud in the same position as the PP alternator.
A bit of heat on the outer housing and the coil came out with gentle tapping on a wood block. Once the coil is removed, place it in the freezer, this will make it much easier to reassemble. About 1.5 hours to accomplish the task.
Bearing marked NSK Japan.
Thanks to Ruready for pointing out this alternator and Roger for the instructions.
Attachments

BillL
Well Known Member
Following Rogers instructions, I re-clocked the alternator rear housing to place the output stud in the same position as the PP alternator.
A bit of heat on the outer housing and the coil came out with gentle tapping on a wood block. Once the coil is removed, place it in the freezer, this will make it much easier to reassemble. About 1.5 hours to accomplish the task.
Bearing marked NSK Japan.
Thanks to Ruready for pointing out this alternator and Roger for the instructions.
Thanks for this confirmation Don - -Looking at the ASP website, they have the 60 amp version is this same form factor. This means the same housing, but the stator and rotor are the same mechanical dimensions.
I have been off and on looking at alternatives for the PP since 2018.
It "appears" that this base unit could be converted to a nice replacement with B&C - like reliability.
It seems to need:
1. new (B&C) mount hardware
2. fabricated aft steel leg for mounting
3. B&C tension arm
4. PP regulator w/voltage limit and external field supply.(11-1043 HARTZELL PLANE-POWER REGULATOR BRUSH ASSY -$100 @ Spruce)
So, roughly $450 for the parts it would then bolt into position and provide the voltage limiting of the PP EI60. The PP EI60 is now on the order of $1260. $200 core???+$1056 for unit.
What did I miss?
Last edited:
dpansier
Well Known Member
EarthX offers a overvoltage device, linked here:https://earthxbatteries.com/product/ovpd-over-voltage-protection-device/
Thanks Bill, I’m thinking I should gather the parts and try this over the next couple months.Thanks for this confirmation Don - -Looking at the ASP website, they have the 60 amp version is this same form factor. This means the same housing, but the stator and rotor are the same mechanical dimensions.
I have been off and on looking at alternatives for the PP since 2018.
It "appears" that this base unit could be converted to a nice replacement with B&C - like reliability.
It seems to need:
1. new (B&C) mount hardware
2. fabricated aft steel leg for mounting
3. B&C tension arm
4. PP regulator w/voltage limit and external field supply.(11-1043 HARTZELL PLANE-POWER REGULATOR BRUSH ASSY -$100 @ Spruce)
So, roughly $450 for the parts it would then bolt into position and provide the voltage limiting of the PP EI60. The PP EI60 is now on the order of $1260. $200 core???+$1056 for unit.
What did I miss?
BillL
Well Known Member
EarthX offers a overvoltage device, linked here:https://earthxbatteries.com/product/ovpd-over-voltage-protection-device/
That looks good for a stand alone part. I think that addition of the $99 Hartzell/PP regulator/brush holder/brushes will generate OV and field control many (me) might desire.
We may have good news from your teardown. That SRE housing has a 6002 bearing. The PP has a 100mm OD stator. If that is the same as your housing then it could offer a repair part for damaged housings for PP owners, and likely would have a proper diameter to prevent recurrence of bearing orbit.
Thanks Bill, I’m thinking I should gather the parts and try this over the next couple months.
I'll send you my PP EI-60 teardown report on the PP in an email. If it is large for email, then via dropbox. It may help.
Don, if you want the report send your email address via PM.
Following Rogers instructions, I re-clocked the alternator rear housing to place the output stud in the same position as the PP alternator.
A bit of heat on the outer housing and the coil came out with gentle tapping on a wood block. Once the coil is removed, place it in the freezer, this will make it much easier to reassemble. About 1.5 hours to accomplish the task.
Bearing marked NSK Japan.
Thanks to Ruready for pointing out this alternator and Roger for the instructions.
Why did you reclock it, I like the stud pointing up away from the exhaust, did you have fit issues with it clocked in the original position?
dpansier
Well Known Member
Why did you reclock it, I like the stud pointing up away from the exhaust, did you have fit issues with it clocked in the original position?
I re clocked it to place the output stud in the same position as the PP Alternator, this position requires no wiring changes.
The exhaust on #1 exits to the rear and down so the pipe well away from the Alternator.
eavila1
I'm New Here
Question. If going with the L-40 replacement Denso alternator that Ruready listed, which looks identical and much cheaper......do you have to modify it by taking out the internal voltage regulation? I have the external B&C voltage regulator to use. Recommendations? I'm learning...
walkman
Well Known Member
@ruready, thank you for the info! I could see it was the same case... have gone through a month of headaches and downtime trying to get help and machine shops to help me out... I don't have a machine shop, the alternator shop guys looked at me like we won't make you a bracket and why the **** would you do that? Unbelievably frustrating process... thank you for the diagrams.
Still stuck at the moment, Alternator shop sold me a 2nd Denso (55amp) that is more like the kubota alternator that came off the O-320... had to get a longer belt for that one to get it away from the prop oil line, had to pull the prop, which then maxxed out the tensioner bracket, then had to add a larger pulley... and of course the cost will wind up being more than if I just bought the full L-40 kit from B&C... sorry, wish I had more machine shop folks to help me around KMYF
Just a single point of data, and possibly contradicted by the experience of others here, but I was regularly going through these same automotive alternators on my plane, so much so that I kept a spare so I could quickly swap, until I purchased a Plane Power alternator. Haven't had a failure since.

