What's new
Van's Air Force

Don't miss anything! Register now for full access to the definitive RV support community.

21is/U Page 8

Cameltron

Member
Patron
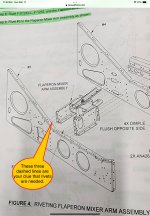
I finished Section 21 a while ago, but I noticed these three holes not riveted. I looked at 21 page 8, which is where the flapperon mixer box gets attached to #3 seat rib. Looks like I didn't take the LP4-3 TYP note liberally enough, or do these get riveted elsewhere. It's not explicitly called put in the drawing and there are no visual call outs.

Everyone else have this riveted?1000013527.jpg1000013528.jpg
 
I just started Chapter 21, so not there yet. But the holes you are pointing are perpendicular to the LP 4-3 called out in the drawing, or am I mistaken? I
 
Yes, the three dashed lines are your clue.
I have not received that kit, but looking at the drawing, it appears the 3 holes he is referring to are on the face of the Flaperon Mixer Arm Assembly, not on the end where it gets riveted to #3.
 
When I was working on 21iS/U-08, I left those three holes open. I guess I better read ahead in the plans to see if I can determine when you are supposed to rivet those holes.
 
They are not riveted on my plane, and there's nothing later in the plans that does rivet them. I'm on Section 38.
 
When I was working on 21iS/U-08, I left those three holes open. I guess I better read ahead in the plans to see if I can determine when you are supposed to rivet those holes.
Mark,
If you find out when/if they get riveted, can you post. I will make a note for myself and will thank you for your work.
 
I have not received that kit, but looking at the drawing, it appears the 3 holes he is referring to are on the face of the Flaperon Mixer Arm Assembly, not on the end where it gets riveted to #3.
I just started Chapter 21, so not there yet. But the holes you are pointing are perpendicular to the LP 4-3 called out in the drawing, or am I mistaken? I
Yes the holes are the three that join the flaperon assy to the F-1269 servo doubler. The dashed lines call out the flaperon assy to #3 rib web. I'm going to read ahead and see if there is anything that interferes or gets riveted there, there is no call out not to rivet them, so the LP4- 3 TYP callout probably implies those too.
 
Yes the holes are the three that join the flaperon assy to the F-1269 servo doubler. The dashed lines call out the flaperon assy to #3 rib web. I'm going to read ahead and see if there is anything that interferes or gets riveted there, there is no call out not to rivet them, so the LP4- 3 TYP callout probably implies those too.
Yes, now as you post the question, I think I will rivet them as well. At least it shouldn’t hurt unless anyone finds something where the rivet heads might get in the way of something else.
 
I think the part in question is F-1220B. Looks like this part is used in two places, the Flaperon Mixer Arm Assembly and the Pulley Bracket Assembly. Those three rivet holes are used the latter but not the former.

1710706348100.png
1710706382313.png

But I could be wrong.
 
Lots of good information from the group! After reading everyone's posts, I think the three holes in question in the F-1220B should be riveted to the F-1269/#3 rib while working on Section 21. But to be sure, I'll send an email to tech support and report back with their answer. Cameltron, do you mind if I send tech support your photo?
 
Lots of good information from the group! After reading everyone's posts, I think the three holes in question in the F-1220B should be riveted to the F-1269/#3 rib while working on Section 21. But to be sure, I'll send an email to tech support and report back with their answer. Cameltron, do you mind if I send tech support your photo?
Feel free to send the photo over!
 
I ended up (trying) to rivet these holes. Even using a double stacked wedge and the hand squeezer, I could only get 2 out of three. Rivet them before you get the floor on the rib assy!

1000013584.jpg
 
I ended up (trying) to rivet these holes. Even using a double stacked wedge and the hand squeezer, I could only get 2 out of three. Rivet them before you get the floor on the rib assy!

These might help. The top photo is a hand rivet puller that I ground away the nose portion where you insert the rivet. It's ugly, but it works just fine. The second photo is a close-quarter rivet pulling wedge from Cleaveland Tool.IMG_1757.jpegIMG_1758.jpeg
 
Regarding pulling those rivets, I got a long way through my build with a very inexpensive Stanley rivet puller from Home Depot, but when i started working on the fuselage it became obvious that the design just wasn't going to work in some of the tighter spaces. I found a used PRP-26A puller on eBay as suggested in section 3 for less than a third the cost of a new one. It has easily been worth the minor expense. It's only shortcoming is that it has trouble gripping the stems on the tiny stainless steel flush rivets used on some of the nutplates, but the Stanley works perfectly for those. The PRP-26A would easily pull the LP4-3s in question here in that tight space. Maybe there's a builder near you that has one you can borrow? (I don't have a photo handy, but if you Google the part number you'll find many that show how the design is appropriate for tight spaces.)
 
I agree the PRP-26A has been a very effective and handy tool to have. I have not had any issues using it with and without the Cleaveland Tools pulling wedge which I also consider mandatory for a builder's toolbox.
 
I also found a "vintage" PRP-26A on eBay. I think mine was maybe a quarter the new price.

I also purchased the nose piece for 3/32" rivets and drilled it out slightly to be a close fit on the LP4-3 rivets. It produces less of a burr that way.

I also filed down the end of the tool to give even closer quarters use, without the wedge tool.
 
Back
Top