What's new
Van's Air Force

Don't miss anything! Register now for full access to the definitive RV support community.

Filling Fiberglass Pinholes

mountainride

Well Known Member
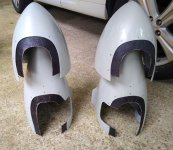
I have had my airplane wrapped for 4 years and for the most part it has held up well and been perfect! Exception is top of the cowling which would bubble after shutdown. I am rewrapping my top cowl today and found the culprit in the pinholes in the factory gelcoat. I had wrapped the fiberglass just as it came from vans besides cleaning really well.

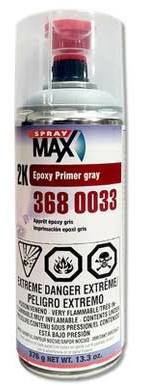
What is the best way to fill these pin holes without changing the contour or having a bunch of sanding? I am assuming I need to spray to get an even coat of whatever product I decide to use. Is there a rattlecan product that will fill these voids? Thanks for any advice.

wL1sbQR.jpg

AvR8JoS.jpg
 
I found Evercoat worked really well. It's a two-part type filler you mix and spread. You can get it at most any auto paint store if you don't want to wait to order it from Amazon or something. It's lightweight, dries very fast, and sands well. You have to be ready to go when you mix it up--you literally have minutes to spread it out with an auto body spreader before it starts to set. As I recall, you can be sanding it in 15-20 minutes.
 
I used a high fill primer. It will fill most, but not all pinholes. Then I used glazing putty worked in with a credit card for the persistent ones, followed by another coat or two of high fill.
 
Pinholes

I'm no paint expert but I want neat epoxy in the pin holes.
You might call Scott (rocketdoc) up in Fort Collins. He's one of the best at painting I've ever seen. Beautiful work.
 
I used a high fill primer. It will fill most, but not all pinholes. Then I used glazing putty worked in with a credit card for the persistent ones, followed by another coat or two of high fill.

Yep, I’ve found a platinum credit card with a $20,000 limit works best LOL
 
Last edited:
The pinholes discussion is almost as passionate as primers. :)
That said . . . .
Key for me is to squeegee the filler INTO the holes.
Too many times have I sprayed on a filler just to have it open up again when I send it down. Many spray fillers just 'bridges the holes and don't really fill.
My first cut is to press on a paste filler to force the filler in. (Saved credit cards plastic from hotel room keys work well) Then finish with a spray filler if needed.
 
Before committing a full sheet of new vinyl to the new primed surface, check adhesion quality with a small test piece first. I found vinyl doesn’t stick well to some primer paints. If that is the case than spray a coat of RustOleum or similar to get better glue action.
 
Key for me is to squeegee the filler INTO the holes.

Exactly. And what you use doesn't matter a lot. I prefer an epoxy wipe, or brushed water viscosity epoxy. Some folks have used drywall compound, and I'm pretty sure you could use river mud, as long as you sand off all not down in a pinhole, and follow with something to seal it, like epoxy primer.
 
West Systems

I used micro fill thinned out using acetone. Thin enough to brush on using a crisscross pattern. A little sanding required but the finish was great.
 
River mud. That made me laugh out loud! I'm getting ready to fill pinholes in some wheel pants, intersection fairings, etc. I plan to try the Evercoat product, I've had it "in stock" for a month or so. If that doesn't work, maybe I'll try river mud. Sounds heavy, though.
 
BTW, a pirep...I picked up a gallon of Akzo Nobel 28C1 last year when a fellow was moving cans nearing expiration at a good price. Wipe on, rub it in while wet to fill the holes, let it dry, and buff off the excess. It's a lot like waxing a car with old school paste wax. For sure it's not effortless.

Subject was a set of Vans wheel pants. The 28C1 works as advertised, filling the pinholes. That said, it does not fill the little divots and larger bubble cavities which are often apparent on the surface of bare molded composite. They they required correction with a 2K skim filler after spraying an epoxy primer, plus a few rounds of K36 to get decent surface contour. Edges finish better with the epoxy shell approach.
.
 

Attachments

  • Gap Seals.jpg
    Gap Seals.jpg
    123.8 KB · Views: 36
I had the pink cowling. I just used epoxy that was applied very thin with multiple coats. I did the same on the inside too, which makes clean up much easier. Oil gets into those pinholes too.
 
Howdy everyone. I will be wrapping my plane as well and have sealed the cowling on the inside with thinned epoxy. Section 12 of my -7 instructions walk you through the process. Example below:

FINISHING THE SURFACE OF THE COWL

Epoxy pre-preg structures like the cowl are pressed into the mold during curing by vacuum pressure. This process precludes the use of the traditional gel coat, so the outside surface must be filled after the cowl is removed from the mold. If this step is omitted, the painted surface will be covered with pinholes -- not a pretty sight.


STEP 2: When the cowling is completely sanded, use an air hose to blow off the dust, paying close attention to the voids in the finish. These areas must be clean for the resin to adhere. Mix a small amount of epoxy resin (about 1 oz. We use West Systems 105 resin and 205 hardener, but any good epoxy will work.) Thin the resin about 1 to 1 with acetone (or approved product recommended by the epoxy manufacturer). This may seem thin but it works well. Use a cheap bristle paintbrush (not a foam one) to cover the cowling with a thin coat and let it dry overnight. If the resin begins to thicken while you are applying it, just thin it with more acetone.
 
Last edited:
Back
Top