What's new
Van's Air Force

Don't miss anything! Register now for full access to the definitive RV support community.

Any way to fix E-606PP that was dimpled by mistake?

inktomi

Active Member
Sponsor
Hi!

I screwed up and dimpled the bottom flange on E-606PP along with the skin. Of course, that's an issue since there's a hinge that goes in between the two. Is there any way to fix this, or do I need to order a new E-606PP?

Maybe the hinge could rivet to the underside of the flange, instead of in between the skin E-606PP? This would make the trim tab not align though, right?

Maybe I could dimple the hinge instead of machine countersinking it, though I know the hinge material is too thick to normally dimple.

Any ideas? Or should I drill out the 22 rivets and replace it - hopefully not damaging the skin in the process?

E-606PP Dimple.png
 
I did some searching and found this from another thread... looks like I will just use the flat set in the squeezer and squeeze it back to flat unless anyone has a better idea.

If you dimpled where you should have countersunk, just undo the dimples. According to Van's tech support guys, you can do this one time. This also applies if you dimple the wrong direction. To undo a dimple, just put a flat rivet squeeze set in your squeezer, and flatten the dimple. Then you can countersink it as appropriate. I know this because I just did the exact same thing 2 days ago and had to call Van's.

If you countersunk where you should have dimpled, no big deal. Just leave it and your dimpled skins will set into the countersinks.
 
I did some searching and found this from another thread... looks like I will just use the flat set in the squeezer and squeeze it back to flat unless anyone has a better idea.
I don't recall the thickness of the hinge, but it is possible to dimple .040 thick and the hinge material is also softer than the 2024 aluminum. If you have a scrap piece you could test first to make sure it doesn't distort too much.

Un-dimpling by squeezing will flatten the dimples but not quite 100% flat. If there is any doubt then a doubler strip on the inside of the spar flange could be riveted into the stack.
 
In the EAA Sport Air metalworking class we dimpled our hinges, they were the same sort that Van's provides. They dimpled fine - though the teacher did say we were only doing that for speed and it would be better to countersink them. I bet that the hinge material would dimple, if that would be the best option.
 
The hinge material is AN257-P2, which I think is this in spruce. https://www.aircraftspruce.com/catalog/pnpages/03-00048-6.php

It's listed as 0.040 thick.
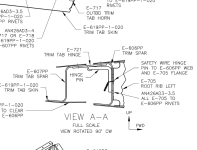
I just looked at DWG 4 and am now a bit puzzled by the first post because the hinge is to be attached to the inside of the top flange on E-606PP. Post #1 mentions the bottom flange and also that the hinge goes in between the skin and the flange, however I don't believe that's the case. Maybe have another look and potentially there is not a problem, hopefully?

Trim Spar.png
 
Last edited:
Countersink the hinge to accept the dimple. Done it on 4 airplanes in that spot. I would recommend that when you use the countersink, that you do it on your bench or a piece of wood. Drill the hole pattern into the wood through your holes in your hinge and cleco it down. One by one, counter sink your hinge . Doing it this way keeps the countersink tip from wobbling out and enlarging the hole. Use a piece of dimpled aluminum as your gauge to ensure you are CS it enough.
 
Amazing! I'm a software engineer, and it's taking some time reading these drawings. More than reading and understanding.. finding the relevant drawing is not always easy. I wish the digital versions had the text searchable so I could search the drawing for a part number to find everywhere it's called out.

It does look like the hinge goes on the bottom of the flange, so no issue. I countersinked the hinge for the trim tab on the bench by using an existing hole for the guide to go into, it worked really well. Thank you!
 
Just a note, I was taught was that you could reverse a mistaken dimple by flattening it once. Subsequent times requires replacing the part due to metal fatigue.
 
Amazing! I'm a software engineer, and it's taking some time reading these drawings. More than reading and understanding.. finding the relevant drawing is not always easy. I wish the digital versions had the text searchable so I could search the drawing for a part number to find everywhere it's called out.

It does look like the hinge goes on the bottom of the flange, so no issue. I countersinked the hinge for the trim tab on the bench by using an existing hole for the guide to go into, it worked really well. Thank you!
The digital plans for my RV-8 are searchable. I may have OCR’d them, can’t remember. But I definitely search the digital plans all the time.
 
Yes, the hinge does go on the bottom as shown on the drawing, but the instructions say to countersink the spar (so that the hinge is drilled plain). I think this is done a few other places too, like the flap hinge? In any event, if I (cough, cough) dimpled the spar, I would not hesitate to countersink the hinge.
 
Amazing! I'm a software engineer, and it's taking some time reading these drawings. More than reading and understanding.. finding the relevant drawing is not always easy. I wish the digital versions had the text searchable so I could search the drawing for a part number to find everywhere it's called out.

It does look like the hinge goes on the bottom of the flange, so no issue. I countersinked the hinge for the trim tab on the bench by using an existing hole for the guide to go into, it worked really well. Thank you!
Buy the pdf plans and manual on the thumb drive. Download onto your phone and tablet. The manual is searchable and both are easier to browse when, well, you know…
 
Last edited:
Back
Top